If you can’t find what you want…

…make it!  I’m a DIY kind of girl, always have been. I’m frugal, and learned many skills from my mom; ours was a big family with a limited income, she made do, did a lot of the projects around the house, figured out how to fix things herself. I still tend to do things myself rather than pay someone to do it. Last weekend, I tore the mantle and fireplace surround (with trim all the way to the high ceiling) off my fireplace by myself rather than pay the contractor to do it. Last Fall, when I moved, I wanted a jewelry case to hang in my walk-in closet, that would protect my silver pieces from tarnishing. There are lots on the market, but they were not for my frugal self. And, I decided I didn’t need a large one.

So, I went to Hobby Lobby, bought a 10″ x 20″ shadow box frame, and pulled out the poorly installed canvas backing. I couldn’t find a white frame, so I bought a black one and spray painted it with white enamel that I happened to have on hand. I didn’t take the glass out, I just very carefully taped newspaper over both sides of the glass.

Cut a piece of mat board to fit, and covered that in batting and fabric to match my paint color:JewelryCase1 First, folded in and glued the batting…JewelryCase2 Then did the same with the fabric. The front side looked like this when I was done:JewelryCase3 I glued this into the bottom/back of the shadow box, then drilled holes for cup hooks that I had also spray painted white. (If I were to do this again, I would have used an awl to make my pilot holes–the drill bit got wrapped in batting each time and was a bit of a pain):JewelryCase4 Once the cup hooks were all screwed in:JewelryCase5 And voila! The finished project hanging on the wall of my closet:

JewelryCase6 The wire rack below it is what I have used for years for my necklaces/chains, but anything silver always tarnished quickly hanging out in the open air. Really, a fairly easy project that cost me about $22 total. JewelryCase7Now to get that fireplace surround re-done…

Happy creating,

Doris

From dinosaur to…

…possibly the cutest “up-cycle” project I’ve ever completed.

Over a year ago, I was trying to help my mom sell an entertainment center via craigslist and Facebook. It didn’t fit her new television, so it had been moved to her garage. Well, we couldn’t sell it, we couldn’t even give it away — literally — our local salvage/resale shops won’t take them. So, it became a dinosaur taking up space in my mom’s garage.

But then I saw this, the piece in the before pic is almost an EXACT version of my mom’s dinosaur, shown here:

EntertainmentCenterI sent the pin to my sister and a plan was hatched.

Just before Christmas, we moved the entertainment center from mom’s garage to my garage, and we started painting and remaking it as a surprise for my niece.  We had a lot of fun brainstorming ideas… the sink is a cheap plastic mixing bowl, the faucet is the top of an m&m candy cane that we spray painted, the oven “rack” is a shelf organizer, the burners and stove and faucet knobs are all from the unfinished wood aisle at Hobby Lobby. We used leftover paint from other projects, and  bought kitchen cabinet knobs to use as handles. The inside of the fridge is painted all white, and the shelves are repurposed as refrigerator shelves. The investment in this project in terms of dollars was pretty small.

CollageForBlogWe cut a piece of MDF for the “wall” of the kitchen, my sister didn’t want a cut out (like the Pinterest piece had) in it since it would sit up against the wall in their play area, so I painted an outdoor scene, blue sky with fluffy clouds, flowers and a bunny in the yard, framed it out with 1/2″ trim board for window “mullions”. I also painted a grocery list on the “fridge” door, and a kitty and puppy magnet. (Her grocery list reads milk, juice, candy, bacon — likely a list Zoe would come up with if you asked her what we should buy at the grocery store!)

ZoeKitchen3I made a valance for her “window” out of this yellow Sunkissed fabric by Sweetwater, and trimmed the wash clothes my sister bought for “towels” in the same. The “towel ring” is a plastic scarf ring from Target that I made a little leather holder for. We added cup rings to the opposite wall to hold her utensils.

ZoeKitchen2

ZoeKitchen1We moved it fro my garage, over to my sister’s basement play area on New Year’s weekend, while Zoe was napping. When we had it moved it, I went into her room to wake her up, and I carried her downstairs to see her surprise and she woke up in a BIG hurry when she saw it! (Her brothers were just as excited) A few weeks later, I finished the little apron I made her to match–once she tried it on, she wore it the rest of the day!

ZoeApronCollageShe loves her kitchen, our mom loves that it’s not sitting in her garage anymore, and I love that we didn’t have to send it to the landfill. Win-win.

Happy creating,

Doris

X & Plus Block — DOUBLE-SIZE!

In 2013, I had my International Stashes Bee make me X & + blocks, using Badskirt Amy’s tutorial. Her tutorial makes 8″ unfinished (7.5″ finished) blocks. The Bee members used a lot of text fabrics and bright colors, and I LOVE the blocks; but it’s still a WIP.

Then, I saw THIS quilt by Karen:

11246790656_cf895f368d_b

Karen of CapitolaQuilter

When I saw that photo, I was SO grateful that I hadn’t pieced my quilt top yet–because I want a quilt like that to hang on my high, cathedral-ceiling wall in my living room! So, I’m asking my Sew Sisters Bee to make me 15.5″ (unfinished) blocks to go with my smaller blocks.

Karen did a great tutorial for her big blocks, but hers finish at 24″–too big to be companion size with my 7.5″ blocks. Her tutorial includes a GREAT tip for getting eight bonus HSTs (it was definitely a “why didn’t I think of that?” moment!).

SO anyway… for me it was back to the drawing board, to figure out cutting sizes for a block to finish at 15″ (15.5″ unfinished). Here you go:

15″ X & Plus Block cutting:
Plus Center (navy floral) = two 3″ squares and one 3″ x 8″ rectangle
Plus Ends (green print) = four 3″ x 4.25″ rectangles
Background (text print) = eight 4.75″ squares
X (tree print) = four 6.75″ squares (THIS SHOULD ACTUALLY BE 4 DIFFERENT FABRICS, I cut mine from the same print because each piece of my fabric varied so much)
X&+Block1Draw a diagonal line down the center of the wrong side of the 4.75″ squares. Match up to a 6.75″ square, right sides together (RST), sew along drawn line:X&+Block2

Trim seam to 1/4″, and press open toward smaller triangle. Repeat for opposite corner as shown here to complete each corner X unit (your corner unit should measure 6.75″ square):

X&+Block3

TIP: You can chain piece all of the center lines on one side, then the center lines on the other side to make this go together a little quicker.

X&+Block4

Sew two 3″ x 4.25″ green print rectangle to the two 3″ navy floral squares RST, press seam open. Add a corner X unit to each side of the green/navy floral units as shown above.

Sew a 3″ x 4.25″ green print rectangle to 3″ x 8″ navy floral rectangle. Join three sections to complete your block. Square up to 15.5″ if needed.

Here is my finished block along with the smaller blocks from my 2013 Bee:

X&+Block5I look forward to getting this pieced together and hung on my wall!

(EDITED: Vicki pointed out to me that I had the block sizes mixed up (good catch!)–the post is now edited; my blocks are 8″ unfinished and 15.5″ unfinished).

Happy sewing,

Doris


How I almost ruined, and then saved, a quilt:

Do you pre-wash your fabrics? I used to be a faithful pre-washer, but then pre-cuts entered the picture, and well, you can’t pre-wash a charm pack… so I stopped pre-washing my other fabrics. After the experience I’m sharing with you today, I think I’ll start pre-washing again.

In May, I shared this lovely finish with you:

Love in a Mist Quilt

With the exception of the outer border print, this quilt was made entirely from my scraps and stash (even the fuschia Petal Power piece peeking out from the back was in my stash).  The white background came from my stash and scrap basket. And that is where the crack in the system occurred.  Stick with me…

On our pattern business blog last week, Trina wrote this in regards to using white as a background fabric: This is my word of caution about using white (which I totally love). If you are using white make sure it is the same white, (brand and color) …all white fabric is not created equally… take a look at some aged quilts with an assortment of white fabrics and you will find the whites are not the same color of white & some look transparent. Doris found this out the hard way, with a laundry catastrophe, about three weeks ago. ;-) ”

Yep.

And I know this, and I try to follow this advice.  With this quilt, as I was cutting and sending out scraps to my Bee members to be sewn into blocks, I thought I was cutting all Kona White for the quilt… but I figured, it’s scrappy anyway, it shouldn’t matter. Right?

Then came August 19th. We had had visitors for the weekend and this quilt was on the bed in the guest room; and our cats had slept on it during the day, so I wanted to wash it because it was one of my entires for the Guild Show that will run in conjunction with next week’s American Quilters Society Show in Des Moines.  Later that evening I posted this to facebook:

“I am a Shout Color Catcher disciple; but the ONE time I forget to throw one in the washing machine, I get pink bleed on a quilt. And of course, I didn’t discover this until i pulled it out of the dryer. I’m sick about it. Just ordered Sythrapol Detergent that will be here by the weekend and commenced praying for the miracle this situation will require. Another fabulous Monday.”

Well, as it turned out I DID have one Color Catcher in the load (I found it on the floor later) but I should have had a BOX of them in there!  I can’t believe I didn’t take a picture of PINKness of the quilt, but then again, I was TRAUMATIZED by the whole situation, so maybe I subconsciously chose not to take a photo for posterity sake in case I couldn’t get it out, anyway!  The outer border was VERY pink, and the white was all a little pink looking. So…

  • First I soaked it for a few hours in Norwex detergent, then washed it (LOAD #2).
  • Then I soaked it overnight in Sythrapol, and washed it in hot water (LOAD #3).  Better, but not white, yet.
  • Again I soaked it overnight with Sythrapol, and washed it in hot water (LOAD #4)
  • Then a wash with just cold water and a small amount of diluted bleach (LOAD #5. NOTE: each wash included three color catchers) the pink is nearly gone from the border print.
  • Another soak and wash with diluted bleach and Dawn Dish Soap (LOAD #6)
  • Looks pretty good, so one more wash to rinse whatever detergents are still hanging on in there (LOAD #7).

As you can tell in this pic of the used Color Catchers, there was still pink leeching out after seven washes!

Sythrapol Color Catchers

But, as for the whites, they did not turn “pink” consistently.  Apparently my “Kona White” background included some other whites, or maybe some Kona pieces that were pre-washed as well as some unwashed Kona.  Either way, certain blocks had a VERY pink background.  Most of it is invisible today, unless I point it out to someone.  Which, anyone who reads this and then sees the quilt on display next week in the guild show will be able to spot it.

This is a pic taken last night in our backyard:

After The Rain _ quilt post laudry disaster

Overall, it looks pretty good (crinkly, as it’s been very well-laundered) 😉  But up close, there are a few white patches that still have a slight pink tint:

After The Rain Yellow Block

AfterTheRainRedBlock

One of the tips I got: a long-arm friend of mine, and longtime quilter said she always washes her quilt with Ivory Soap.  It’s pure, no dyes or perfumes, additives.  I think I’ll make that a new practice; as I will going back to pre-washing.  And I’ll continue to use Color Catchers in every load of laundry I do!

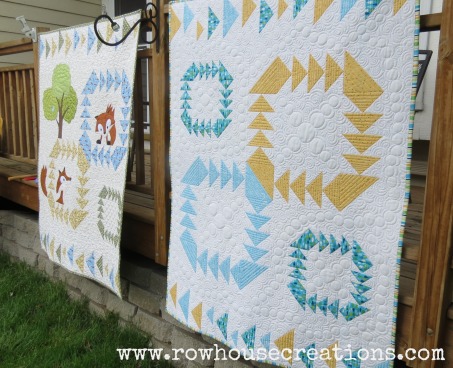
But, I did drop the quilt off last night for our Guild Show, along with two Row House Creations quilts:

Lavender One Big Cabin Girl Quilt Racoon, Owl Squirrel Baby Quilt

Fox in a Box Fox and Geese Applique Quilt

We drop our quilts off at a LQS, this is one side of the room as it looked last night (the last night for entries), there must be 300-400 quilts all tucked away in pillowcases waiting to be hung for display:

AQS Quilt Drop Off

I’m glad I’m not judging them, but it must be a little like Christmas morning to open all of these pillowcases and unfold what’s in them!

Our Des Moines Area Quilters Guild Show runs October 2-5 in conjunction with the AQS Show at the Iowa Events Center in Des Moines, Iowa.

Do you pre-wash?

What do you use to wash your quilts?

What a Tangled Web We Weave – Spiderweb Block Tutorial

BLOGTOBERFEST, Day 31

Today is the last day of Blogtoberfest, and my day on the Wicked Blog Hop.  Also joining in on Bloggers Quilt Festival with this fun Halloween quilt!

My “wicked” quilt block is the spiderweb block used to make my What a Tangled Web We Weave quilt, which received an honorable mention in the Des Moines Area Quilters Guild show this October.

The finished size of the quilt is Twin Size, and it takes 20 spiderweb blocks.  Here it is spread out on our Queen Size bed:

To make the blocks:

  •  Cut randomly sized strips of fabric across grain by width of fabric (wof) and sew into strip sets at least 6 1/2 ” wide.  (for one block you will need 1 or 2 strip sets, for the Twin size quilt you will need 18-20 strip sets)
  • Using a 60-degree ruler, cut alternating triangles from your strips sets in this fashion:

  • From background fabric, cut one 5 7/8″ square, cut in half diagonally into two half-square B triangles.
  • Also, from background fabric cut two A template pieces, and two Ar (A-Reverse) template pieces.  Template is provided here: SpiderwebTemplate
  • Add a B triangle to the flat end of two of your strip wedges, and add two A triangles and two Ar triangles to the flat ends of your other strip wedges like this:
  • Sew three wedge pieces together to create half a block; repeat:
  • Join your two half block pieces together and then square your block:

I fussy cut the inner border from a stripe fabric, it reads “Halloween” over and over…

And the outer border is an Alexander Henry fabric (from 2006, I think) called “Halloween Lane”.  And the backing is another fun Alexander Henry print called “Unhappy Hour”…

Trina’s long arm quilting made the quilt…the spider web details are fantastic, and I adore the cluster of spiders in the square areas of the background:

Thanks for stopping, I’d love to hear your comments on my quilt… and please go pay a visit to these Wicked Bloggers and see what they have to share today:

Candy Corn Crazy

BLOGTOBERFEST, Day 30

It’s true, October 30th is National Candy Corn Day… I’m not sure why we have National “Days” for everything under the sun, but there it is.  And, I admit it, I have a weakness for this stuff.

Candy corn is a sweet confection, made to look like dried corn kernels. It’s considered a “mellow cream,” a type of candy made from corn syrup and sugar that has a marshmallow-like flavor. Although candy corn tastes rich, it’s actually fat-free.  But keep in mind, that does not mean calorie free!  And if you are like me, one handful is never enough…

There are any number of Candy Corn inspired recipes out there, such as Candy Corn Cheesecake:

Candy Corn fudge:

Candy Corn truffles (which look pretty darned tasty):

There are even recipes online for making your own Candy Corn, though I’m not sure why you would bother when Brach’s does such a wonderful job of it for you.

There is no shortage of candy corn inspired crafts either.  I even posted one of my own last year, a Candy Corn themed favor bag, tutorial here.

I might have to make one of these to celebrate next October 30th:

I’m sure you’re hungry by now so go treat yourself to some Candy Corn in honor of Natioanl Candy Corn Day, October 30, 2012…