

(originally posted August 23, 2011)
It’s not really a redo, that was done last year, but this month, it got a definite up-do, or upgrade, anyway, with two great projects!
Today: Project #1, Making a Recessed Sewing Table (a Project ANYONE could do!)
I started with this, my Ikea bookcase and table that I’ve used for sewing for almost two years.

But when I needed to do any quilting, especially free-motion quilting, I would pull out a little drop center table from JoAnn’s to put my machine in. However, the Janome was too large to fit into the table from JoAnn’s. And quilting with the machine too high was just too hard on my neck and shoulders to quilt for very long. So… I traced the footprint of my Janome onto the table top, and my sweetie got a jigsaw and drill out,

and cut a big hole in the table. We figured the worse that could happen is that we would ruin a $55 Ikea table, and have to replace it. The core of the table was a paper cardboard honeycomb core, with two 1x3s running lengthwise for added support…
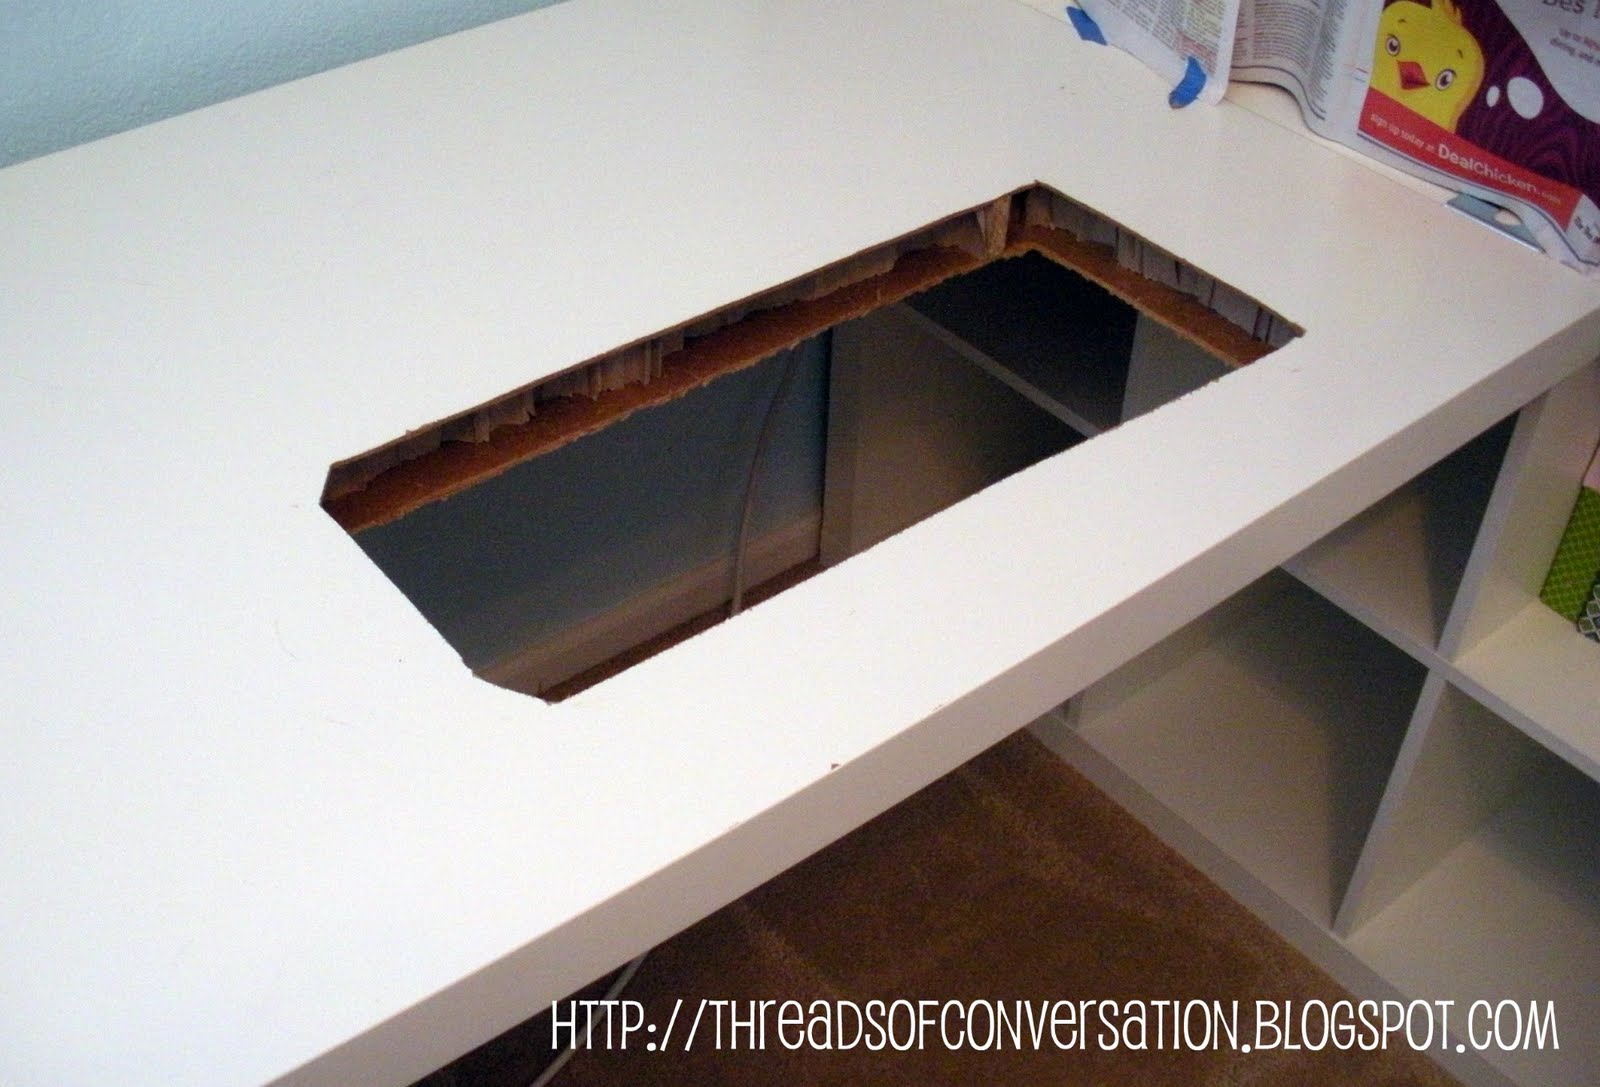
Sweetie added some more 1×3 strips to enclose the exposed core, added wood filler, sanded, primed, painted and eventually we added this shelf, attached with 4″ L-brackets to the table. Here it is without the machine sitting in it:

and voila– A recessed sewing table, custom fit for my Janome Horizon! As you can see, there is extra space to the right of machine, that I allowed for access to the power cord, feed dog switch and power switch. Remember to take that into consideration when determining the footprint of your own machine:

I removed the feet from the plexiglas table that came with my machine and made sure the machine would sit just high enough above the surface of the Ikea table to accommodate it–a perfect fit! If your machine doesn’t have a plexiglas insert, you can have one custom cut at a local hardware store, or glass shop. Just make sure they have a very accuratetracing of the bed of your machine.

We finished this project on Saturday afternoon, and I spent much of Sunday sewing, it was such a pleasure to have the machine at the correct height for a change! I think I could sew an entire day without feeling any strain in my shoulders. A very nice UPGRADE, indeed.

Of course, once we finished I needed to clean the shelves and rearrange everything (sawdust everywhere!) but they needed cleaning and reorganizing anyway.
DIY Tutorials for the other parts of my sewing studio:
Project #2; a sassy new cutting table with storage!
DIY Design Wall anyone can make!
Big Board Ironing Board Tutorial
Fabric Storage (Stash Management)

Look at you go, Doris! You have a machine like mine — minus the tattoos, of course. Have you, by chance, joined the Yahoo group for the 7700? Lots of great tips and stuff on there.
You will love using it that way! Seriously love it!
Seriously sassy! You're ready to go now!
This is a great approach to making this do-able: the hole for the footprint, but the clear lucite shape for the actual shape of the freearm. Genius! To top it off you have a hunk who can do that sort of handyman work for you. Wow. Did you make a good pick or what!?
Wow cool idea, your sewing room looks lovely
That is SO awesome!! Now I wish my sewing table wasn't an old Danish inlaid table! I so want to chop a hole for my machine.
that looks like a perfect fit! What a cool project! Your new sewing studio looks so organized. Such a great place to lose yourself in!
What a beautiful studio…. I am so envious! 😉
Love it! I have some Ikea furniture that my dad gave me. It's a table like yours, and I keep contemplating cutting a hole in it. Mine has formica all over the top and bottom, so I'm not sure how that would work out. And I'm pretty sure mine's solid wood, because it is REALLY heavy. But it would be so nice to have my machine recessed! Love what you have done!
Oh, I meant to ask…how do you like that machine? I have the 6500 and occasionally look at that one and think about upgrading someday….
What a great post – I was going to ask how you like th eHorizon but I see Jean has said there is a Yahoo group so will have a look there too.
Your recessed sewing table looks amazing! I also love your nearly free cutting counter and cabinets. Sweet!!! The covered counter is adorable. What a great idea!
fantastic idea! i’d love to get my husband to help me try this for my horizon.
It’s always so much fun to see where people do their creating!
Your husband did a wonderful job on your table! Great looking room!
Loved this then. Love it now!
Wow, so much more economical than a custom table, it looks awesome.
Hello! Such a nice sewing area! I saw your pic in the flickr group+had to visit your Blog! Happy Stitching!
Pingback: Know Thy Machine | made by a brunnette
Thanks Doris! Love the recessed table! I have been talking about doing that forever, but have never gotten around to it.
Wow, you have a lovely space. Do you ever use your free arm on the machine? I think I would miss having that ability easily accessible….but maybe it’s not necessary if you only quilt.
Anita, I do use my free arm, as I do sew clothing and other things besides quilts, but I have a smaller table I set upo and lift the machine out onto that table to use free-0arm. Works pretty well.
Pingback: Sewing Studio {Round Up or rooms} -
Wonderful idea, my husband can do the same for me. He can now adapt my plexiglass table…thanks!